"All art is quite useless" - Oscar Wilde
RSS

December 28, 2010

Axolotl Plushie

"I am cute!!!"


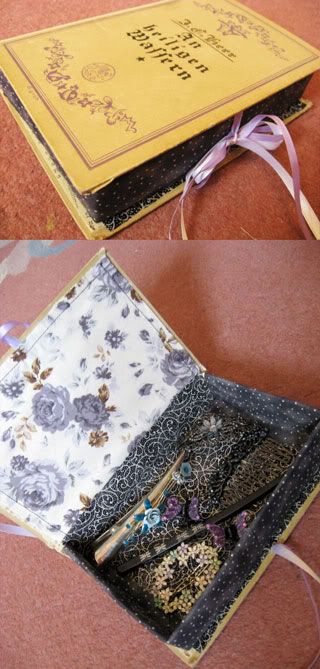
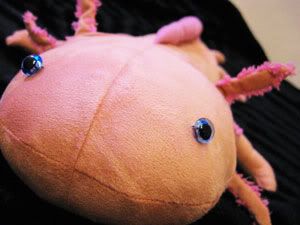
Now this was a Christmas present I made. I was very eager to keep it for myself when it was done, but I gave it away in the end XD

Things you need:
- paper for a pattern
- fabric for the body and the dorsal fin (or whatever that is)
- yarn (don't use cotton! I did...)
- fuzzy wool for the gill rakers
- eyes
- stuffing

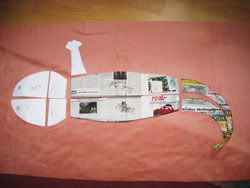
Basically I just made a pattern out of copy paper and newspapers based on some axolotl pictures I found.
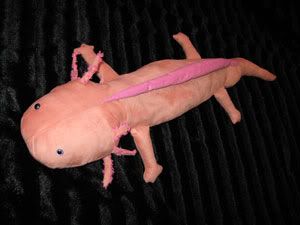
I bought some really nice and fuzzy fake velours leather and used it for most of the plushie.


I bought cotton yarn, but that was not a good idea since it's not very tear-proof. I noticed that during the stuffing process. So maybe you better stick with synthetic yarn.

After cutting out all the pieces I made the gills from small fabric straps and added the gill rakers by attaching some fuzzy wool at the sides.

The rest is basically just thinking about in which order to sew the parts together.


Axolotl picture taken from here.

Be sure to leave a hole through which you can stuff in the stuffing. I'm still not too good at that. Somehow it never becomes a really smooth stuffing, some parts are always crumbling together. Oh well...


Anyway, this is it!

You know you can never grow too old for plushies.
Follow me

December 23, 2010

It's just a piece of cake!

Hello fellows, here comes a very sweeeeet possibility to create a present for your loved ones (if they like sweet things, of course).

I took a photo of the pattern I used and tried to mark it for better understanding. Sitting at my parents home I can't use another program to draw on the computer, which would not be any better, anyways. >D
(click to enlarge)
I acutally used a pattern, decembersong got from some friends a little while ago. It was a Japanese handicraft box including the pattern plus felt.

So this is what you need:
the pattern
different colours of felt
some wad/cotton wool for making plushies, e. g.
scissors
needle/s and threads in matching colours
maybe some glue

I used
middle brown as 1st dough colour
light violet as 2nd dough colour
white for the cream topping
dark violet and light violet for the blueberry
red for the strawberry
light and dark green for the leaves

First, cut out all the patterns. Then start sewing the side parts of the cake. Sew the part of the 1st dough colour with the gaps and the littler 2nd dough part together using a thread coloured like the 1st dough. Sew the side parts on the side where the gaps are, together. You may add some little dots in a different (darker) thread-colour onto the the 2nd dough colour to make it look like there were pieces of fruit in it.
When finished attach the side parts to the bottom part, then add the back part (it's the biggest square on the pattern labelled 1st dough colour, 1x).
Start sewing the top part onto the cake, but leave a little part of it open to fill in the wad, until it's a puffy piece of cake, then close the gap.

Now you can start making the decoration:
Use some yellow thread to apply little dots on the red strawberry felt, then loosely sew a thread through the round part of it. Leave some thread at the end and don't make a knot. Then bend the felt, so it looks like a little cone and sew the straight parts together. After that stuff some wad into the cone and pull on the thread you left at the round part of the strawberry, it will kind of riffle right now and close around the wad. Pull tightly and then sew through the bottom part of the strawberry to ensure that it won't open again.Now attach the strawberry leaf with green thread.

For making the blueberries, cut the cross in the middle of the bigger circle, then sew or glue the little circle onto it. Now sew a loose thread round the edges of the bigger circles each and leave some at the end, not making a knot again. Fill in some wad and pull the thread like you did with the strawberry.
For the little leaves use some lighter or darker thread to sew a line on them, so it looks like a leaf vein, then attach them to the blueberries.

Now you have to sew the cream topping. Sew 3 of the drop-shaped white felt parts together by sewing a line from one end to the other. Then add one of the 3 "half-drops" at the top. I guess you will have to twitch a little until it looks nice.

When finished, add the decoration to the top of the piece of cake.
First, sew the cream topping onto the back edge of the white cream top part. Then place the strawberry and the blueberries in the middle.

Tadaaa~ finished.
You can either give this away as a present or decorate your home with it. :)

Here you can see the cake, decembersong sewed:


Follow me

December 15, 2010

Paper Butterfly Collection

Very animal-friendly :D


Things you need:

- butterfly stamp
- magazines
- a frame
- paper


I got the idea from this blog and wanted to make one myself.

So I ordered a butterfly stamp from ebay and bought a colourful girlie magazine (and felt quite ashamed for it).


Then I just stamped out about 60 butterflies. I only needed fifty for the collection, but it is always nice when you can choose.


I bought the beautiful frame at Xenos (sadly it is made of plastic and while trying to clean the fake glass it [the glass] broke and gave me a nice and clean deep cut in my finger :'D).

Now it's a nice decoration for my mirror corner.


It's a very fast and easy one-evening-project. Try it!
Follow me

December 02, 2010

Book Decoration (Paper Craft)

More paper crafting!


This time I decided to start a larger project I had in mind for a while - a photo book. Have I thought this through thoroughly? I don't think so. That's why I bought a sketch book and some paper crafting paper and simply started. I wonder how many photos I will be able to put onto the pages before I won't be able to close it anymore... oh well.

However, the decoration at the outside of the book is the smaller part which I would like to present here.

All you need:
- a book
- paper crafting paper, napkins, whatever
- special glue lacquer for paper crafting/décopatch
- book corners or better (see below)
- scissors, brushes
- transparent glue, depending on your kind of book corners
- acrylic colours (maybe)

Here's my stuff. I used more graphic45 paper, including the leftovers from the cardboard box project.


At first I painted the black book with acrylic paints in a dark turquoise/blue/brown mix and added some golden highlights. I thought it would fit the overall colouring of the crafting paper motives better. Of course you can skip that part.
There is not much to say about the process of cutting out paper and creating a design that fits your taste. Anyway, the designs were already so beautiful that the result could scarcely look bad, all I had to do was trying to keep a balance between the different objects. Remember to apply the lacquer underneath and on top of the paper.

The result:


I went shopping for some nice and fancy book corners, but I found only some plain and boring ones. Then I remembered how Glittermuffin once used some metal jewellery to create a kind of fake book corners. I liked the idea, so I bought a pair of cheap and very thin metal earrings, cut them apart with a normal pair of scissors and glued them onto the corners with a transparent glue.


That's it. Happy 2nd December!
Follow me

November 21, 2010

Chirashizushi birthday cake

Hello folks and welcome to another cooking entry. Hah!
Yesterday a friend of mine celebrated his birthday. He loves sushi and therefore I decided to make a chirashizushi cake for him. I was inspired by a video of Runny, a very cool and talented guy, who explains how to easily make Japanese food on youtube. You should check his channel!
Okay, but now to the recipe.

Since I couldn't find all the ingredients Runny used, I altered the recipe a little. But the next time I will try to use the "original" ones.

ingredients:
~600 g sushi rice (I used ca. 2 cups)
~scrambled egg made from 3 eggs
~80 g canned tuna
~50 g salmon roe
~80 g smoked salmon
~mirin furikake
~(sushi) vinegar, salt, sugar
~1 spring onion
~red food colouring

Prepare the sushi rice.
I don't own a rice cooker, but it works perfectly fine with a pot, too. Just remember to fairly wash the rice before cooking and only use medium-low heat.
I don't know what was wrong yesterday, but it took me almost an hour until the rice was finished. <-- Lately rice seems not willing to cooperate with me, so don't be afraid. I'm sure it will work fine for you. Also prepare the scrambled eggs. When the rice is finished you have to cool it down, quickly. Fill it in a non-metallic bowl and turn it carefully around using a wooden spoon. A fan is helpful, too. :) Then add the vinegar-salt-sugar mix. For 600 g of sushi rice you'll need about 1/5 cup of vinegar, a tea spoon salt and a little more than a dash of sugar. After that mix half of the rice with the tuna and the other half with the red food colouring and the furikake (add as much as you need until it meets your taste). Then use a 15cm spring form covered with plastic wrap and fill in the red rice first, then the tuna-rice. Use a table spoon to press the rice into the form. Then turn it over onto a plate and remove the spring form + plastic wrap. The top layer will be the scrambled eggs. You could use some drawing paper, like Runny does, or if you don't have it, carefully drape the eggs on top. The salmon roe forms a circle in the middle, after that roll up 6 pieces of smoked salmon (2x4 cm if you need measures) and drape them like roses on the top of the cake. As a finish sprinkle some spring onion over the eggs. You can add little birthday candles, too. Tadaaaa! I hope you'll find it tasty. For me, it was.. and the birthday boy seemed to be happy, too. :)
Follow me

November 12, 2010

Browny-Cheese Cake

Hello folks,
it's been a while since the last post... Lately I've been invited to eat lots of cakes and finally I got the recipe of one of my favourites: Browny-Cheese Cake.
Hope this recipe will be as mouth-watering for you as it is for me. :D


Ingredients:

100 g butter
300 g sugar
60 g flour
500 g curd cheese (low fat ;D)
4 eggs
10 table spoons cocoa
1 tea spoon corn starch
1 dash of salt

First, stir 200 g of the sugar, the salt and the butter until it gets creamy, then add 3 of the eggs. After that mix it with the flour and the cocoa. Put some of the paste aside (~2 table spoons).
Now mix the rest of the sugar, the last egg, corn starch and the curd cheese.

Fill the brownie paste into a flat cake pan (I used one of my gratin dishes) covered with baking paper, then add the curd cheese cream. At last fill in the brownie paste you put aside before and create some designs on it with a fork or something alike.

Bake it for 35-40 minutes at 175°C.

Bon appétit! ♥

(And thanks again to Doro for sending this recipe to me. ^^)
Follow me

September 28, 2010

Homemade Cosmetics, Part One: Eyeliner

Here it is, finally - the first make up recipe, brought to you by yours truly. By now, there is a number of NC (natural cosmetics) eyeliners out, but being the grumpy Muffin I am, I always find something wrong with them, either texture, colour or price tag. As with everything, purchasing the eyeliner ingredients will seem a bit pricey at first (~10€ max), but then again they will make for a very long lasting supply of eyeliner in your choice of colour. The eyeliner we will make is super matte and looks best over a makeup base, but can be used without one as well. It is not water- and smudgeproof but doesn't crease unless your lids are very oily. Try using an eyeshadow base or skin tone eyeshadow underneath if you have problems with oily lids.


You will need:
- Measuring spoon (doesn't have to be a specific one)
- Empty make up jar (eBay; German readers look for "Acryldöschen")
- Oil of your choice, I'm using Jojoba
- Emollient, I'm using Emulsan
- Distilled Water
- Cosmetic Grade Alcohol, I'm using Weingeist
- Pigment: mixture of 1spoon Magnesium Myristrate of Eyeshadow base and 3sp of matte pigment (either use mineral pigments or crush a suitable eyeshadow; it shoud be opaque and pigmented)
- Alcohol for cleaning, rubber gloves, ceramic cup (suitable for microwave)

Prior to starting:
Make sure you are wearing clean rubber gloves and have properly cleaned all you tools to prevent an eye infection.

How to do it:
If your Emollient is firm (i.e. in bead-form), you will have to melt it first. If it is liquid, skip the following step.
1. Add 1sp (spoon) of oil to 1sp of emollient; in a separate cup, pour some of the water and microwave both until the water is hot and the emollient has melted.
2. Add 11sp of water to the emollient-oil mixture and stir. This will result in an emulsion. If you had to melt your emollient and the water is not hot, the emollient will simply harden again and you start right from the beginning.
3. Let it cool for a few minutes, then add 3sp of alcohol. Letting the mixture cool is important as you don't want the alcohol to evaporate in the hot liquid. It functions as a preservative and will keep mold, bacteria and shroomies out and should, thus, not be used in a too small quantity.
4. Then add 4sp of pigment. If you use eyeshadow that is not pigmented enough, you might need more. Whip the mixture with a spatula or the back of your spoon until no clumps are left (this might take some time). Test pigmentation on the back of your hand (Is it opaque?) and add more pigment, if needed. When you're pleased with pigmentation, pour into jar and let it sit for some time as the consistency might become a bit firmer as the mix fully cools down.

We're done! Use a small eyeliner brush or the brush of a used up eyeliner container to apply. Feel free to go absolutely crazy with colours or try some shimmer pigments (they're not everyone's cup of tea, though). Bear in mind that glitter will not stick to the liner as it dries down and becomes non-sticky.

Questions, comments or criticism? Please let me know.

FYI: The original recipe was taken from here, but after some research I found the amount of some ingredients used to be completely wrong (not enough alcohol to preserve the product properly, way too much emollient etc.). The author also suggests using vodka instead of cosmetic grade alcohol. Please don't. Be reasonable, work cleanly and check the list of ingredients for anything that might possibly irritate your skin.
Follow me

September 18, 2010

Cardboard Drawer Makeover

While strolling around in the hobby and art supplies store yesterday I discovered the joy and fun of décopatch. This is so much fun I could spend weeks doing nothing else right now. However, since I have no use for décopatched figures of cardboard animals, I decided to try it on something more helpful: storage space! Again.


I have several cardboard boxes and a drawer that I wanted to redecorate and this turned out to be a very easy and very fun way to do it.

What you need:
- cardboard box or drawer
- décopatch paper, scrapbook paper (you can also use napkins)
- adhesive lacquer (Klebstofflack): this is a special pre-mix of glue and lacquer for décopatching, it will glue your paper to the chosen surface and provide protection from scratches and water
- acrylic paint
- different brushes

The lacquer and papers can be purchased at idee, for example.


At first I applied several layers of acrylic paint onto the cardbox until it was well covered. I added a few drops of water so the paint was easier to apply, but that's optional. If you speed up the drying with a hair dryer, you'll be done quickly with this step.


I bought three sheets of paper for this. Two décopatch sheets and one scrabook paper sheet with a motif on it for the front side of the drawer.

I made a template for the front side of one of the compartments with normal printing paper. Then I cut out three pieces from the motiv paper for the three compartments with that template, leaving little spaces between them for the gaps between the compartments. Now I applied a thin layer of the adhesive lacquer onto the front sides of the compartment, pressed the cut-out paper on it and applied another layer onto the paper.

(As a note: Don't try to completely paint a larger surface with the adhesive lacquer and then add paper because it dries rather fast. Do it step by step. Also, I noticed how bubbles will form underneath the paper when the lacquer is still wet. I tried to press them down, but sometimes they wouldn't disappear. However, after the lacquer dried the surface was completely smooth.)


This paper is from graphic45.

With the same technique I added stripes of décopatch paper to the sides of the drawer and a larger piece to the top.


The layers of paint, lacquer and paper will give some additional stability to the cardboard boxes or drawers, so you don't have to buy the expensive boxes for décopatching. Mine wasn't very solid because it was only a folded cardbox drawer, but it did just fine.

There are billions of possibilities for this technique. Even if you just use it on boxes you can do really elaborate stuff with it, but I tried something simple for the beginning. I think I'll try it on my bathroom furniture sometime soon.
Follow me

September 13, 2010

Making Your Own Cosmetics – Intro

This is going to be the starter post of a series of tutorials on making cosmetics. While it will also feature “classic” home made cosmetics, such as peelings made from stuff you have lying around in the kitchen, it will (mostly) be concerned with making your own make up. Before I bring on the tutorials, I thought it best to put together a post with general instructions, hygiene warnings and tips on where to shop for raw materials. If you are interested in cosmetics making, please read this post first to avoid some major fail, eye infections etc. Thanks.


I. General Instructions

Things you're gonna need:

- Mica – sparkly pigment that comes in a ton of colours. Basic eyeshadow ingredient.
- Matte Pigments – usually metal (mostly iron) oxides, ultramarines, carmine etc. Even if you're not going to make matte eyeshadows, lipglosses etc, these will provide a base to make the micas more vibrant.
- Base powders – these will give your colour cosmetics their texture, which is important. I suggest an equal mixture of titanium dioxide, magnesium myristrate or magnesium stearate, boron nitride (in sparkly shadows) and silica (some people get breakouts from silica, so you might want to test it on a patch of skin first. I normally avoid possible irritants like the plague but that stuff makes for the most silky smooth texture.)
- Oils (jojoba, castor, but foodgrade olive or coconut will do as well), butters (shea or cocoa), waxes (candellila, carnauba or beeswax), emollient (makes water mix with oil), cosmetic grade alcohol (preservative, use in small quantities)
- Alcohol to properly clean all your tools!
- Mortar and pistill, an even plastic surface to work on (should be easy to clean), measuring spoons (preferably in thee different sizes)
- Plastic jars to store the make up in

Generally speaking, all non-sparkly powdery ingredients always should be ground together using mortar and pistill or else you will never get a streak-free mixture. Micas, however, must not be ground! Grinding will destroy the sparkle and you'll end up with dull colours. Look here for an instruction on how to blend micas together (leave out the grinding, though!)

Never fear, you're not gonna need all of those at once. Purchasing those ingredients can be costly at first, but the amount of make up you can make from them will result in very low-cost products (of great quality! I'd never go back to drugstore eyeshadow again).
All tutorials to come will have a separate list of ingredients.

II. Hygiene

In order to avoid possible health hazards, please make sure to ALWAYS work with clean tools only. Wear rubber gloves, a breathing mask and protective glasses (if you can get them) as getting pigment dust into your eyes, nose and mouth is not cool. Clean your gloves prior to working, always use alcohol for cleaning. Clean your jars before filling them. Only swatch your eyeshadows on clean skin. Always clean your brushes after applying make up (this applies to all kinds of make up, no matter if selfmade or store bought! Bacteria will gather in the bristles to cause you eye infections and skin impurities and you want to avoid that. Use mild shampoo or cosmetic brush cleanser and rinse under water.)

Another important hygiene factor are preservatives. You can find a lengthy explanation of when and why they are needed as well as what products can be used here.

Before you introduce any new product into your formulas, make sure it is suitable for whatever you are going to do with it. Read about what it does and how it works FIRST. Don't ever randomly experiment with chemicals or powders if you plan on keeping your eyesight. Thanks.

Other than that, all recipes I'm going to post have been tested on myself. Their basis was taken from existing recipes, which I then altered until I was pleased. Please not that I am no chemist and that you can always react to a product that is fine for everyone else. I do not take any responsibility for things that are going to happen to you when trying out my recipes. I can assure you, though, that neither I, nor the people I gave my products to for testing, have had any bad reaction toward them. I try my best to keep myself informed and updated on the ingredients I use; I avoid irritants as much as possible; I try to keep my products vegan (although I myself am not, but I think that no animal should suffer because I want to paint my face).

III. Where to Shop

Pigments & Base Powders:

I have two addresses for shopping for powders – TKB and Coastal Scents. Coastal Scents also offers premade cosmetics, so make sure you browse the ingredients section. I have also tried other shops but these two were by far the best in terms of service and amount of powder you get for your money.

I suggest using TKB for when you first shop for mineral ingredients. They have a minimum order of 20$, which is a good base to begin with. Get sample sizes only! TKB's samples are so big (way bigger than the teaspoon size they state them to be) they're gonna last you forever. To this day, I have never used up one of their samples... and I make a lot of make up. TKB has a premade matte eyeshadow base of which I got a full ounce (still super cheap, though) and add silica and boron nitride when using it in my formulas. I find it recommendable for beginners as you don't have to worry about your base.
I furthermore recommend getting the mica sample kit (cheaper than buying them separately). Even if you think you're never gonna make blue eyeshadow and won't need the blue pigment anyway, I can promise you, you will. You may, indeed, never make blue eyeshadow, but you may want to mix your own colours, change their hues and whatnot. As time goes by, it will require all of the sample colours. Also get some black, brown and white mica (I got the pearly one). You can make a ton of shades with these colours already.
In terms of matte colours, get titanium dioxide (white; no need to get this if you've chosen the matte eyeshadow base as it's in there anyways), black oxide (really important), matte red of your choice, matte yellow of your choice, TKB's dark brown, matte blue of your choice (although I can't recommend ferric ferrocyanide (prussian blue), it's a pain to work with and SO not beginner friendly) and, if you wish to, chromium oxide green. A note on chromium oxide: to the US, this colour is suspicious of causing cancer and birth defects, to the EU it isn't and it is being used frequently here. Buy it at your own risk, it is the most vibrant green you will get. Nevertheless, I will in a later post instructions on how to mix green, orange and medium brown (so don't buy these).
TKB samples all cost 1,50$ so you can chose a lot. Try not to exceed the 20$ minimum order too much as to avoid customs, since the cheapest international shipping method is 14$. Nevertheless, the size of their samples will provide you with a good starting point without having to re-order too frequently.

For getting some additional pretties or re-ordering colours without having to spend at least 34$, I recommend Coastal Scents. Their samples are smaller than the TKB ones but still a fair amount and they only cost 1$. Also, shipping is calculated according to the amount you buy and generally cheaper than at TKB. Coastal Scents is great for getting additional colours, colour changing micas and stuff you just want to try out. Colours that have similar names to the TKB ones usually are exactly the same shades, so don't be fooled by the pictures. CS's photos tend not to be too accurate. They did include a free sample in my last order, which I found very nice :)

Oils, butters etc.

I get all other make up ingredients at Spinnrad. They have an online shop as well but many cities have one of those stores in one place or another (the one in Leipzig is at Strohsackpassage, Nikolaistraße). I find their prices quite fair and the real stores usually offer a bigger variety and a larger range of quantities of products (because you're not going to use up 1l of il).
No matter where you buy, make sure the stuff is suitable for making cosmetics. Using the wrong products can seriously damage your health, so be extra suspicious. Some of these ingredients also should be available at your local chemist's, so ask there if you have no Spinnrad nearby.

_______________________________________

So much about general stuff. If there are any questions, don't hesitate to ask. Recipes will come soon, but I want to make sure everyone who's interested reads this stuff first so I'm not posting anything right away. Thanks for your understanding.
Follow me

September 07, 2010

Refreshing Strawberry Ice Tea

Summer's almost over. Nevertheless, I still like a yummy, cool drink every now and then. Super quick & easy!


Ingredients:
- water (1l)
- 2 strawberry teabags
- red grape juice (0,5l)
- strawberry syrup (150ml)

How do to it:
Boil the water, put the teabags in and let it sit until it's ready. Add the grape juice and syrup, then stir well. Put the mixture into the fridge over night to let it cool. This will come out really sweet. If you like to drink it as cavity juice, go ahead, but I prefer mixing it with water in a 50/50 ratio.
When serving, add ice cubes and, if you have, fresh, sliced strawberries. Yum!
Follow me

September 03, 2010

Fish do love Coco Milk ---> Gratin

Welcome to another cooking session!
Lately I'm totally into fish and sea fruits, that's why today's recipe will contain salmon (again) and shrimps.


Ingredients:
1 1/2 cups of rice (I prefer Basmati)
~300 g salmon
~250 g shrimps
2 peppers (yellow and red)
1 can coco milk
half of an bigger onion
2-3 garlic cloves
2 eggs
50 g grated cheese
salt, pepper, 5 spices powder, lemongrass powder, chili powder


Do It!
Put the rice and 2 1/2 cups of water into a pot (plus some salt) and cook it with low heat until the water is gone.
Cut the salmon, peppers, onion and garlic cloves into little pieces.


Heat up a pan, then sweat onion and garlic, put the salmon and shrimps into it for ~3 minutes and use some salt and pepper on it.
When the rice is finished take it from the hotplate.

Now we're going to mix the sauce.
Pour the coco milk in a high bin, add the eggs and all the spices. Stir it, until the eggs are mixed up with the rest.
Use the spices until the sauce meets your taste.

Now pre-heat the oven, 175°C, top-/bottom-heat.

Alternately fill the rice, the peppers, salmon and shrimps plus the sauce into a casserole until it's full. Top the gratin with some grated cheese and put it into the oven for 25-35 minutes.

Tada~!


Follow me

September 02, 2010

Antique Book Box

I store a lot of stuff in boxes because I lack proper storage space. However, I didn't have anything to store my hair stuff in. Originally I wanted to make a music box for that purpose, but I ended up making a box out of an old book. Yay!


Required:

a book (surprise!)
fabric
glue
water
ribbon
cardboard
tape tape tape

So, I bought this book in an antique shop.


I couldn't find much information on it except for the fact that there is a movie based on this novel. However, it had a personal dedication inside it. From 1924.


Touching.

The first thing you will have to do is to DESTROY THE BOOK. Probably the most exciting part for every bibliophilic soul with a hidden sadistic desire. Cut out the binding, carefully, with a sharp knife or a cutter. Make sure you don't hurt the back of the book.


Can you feel how it hurts?
No?
Well, try harder. Tear the pages into little pieces and use them for some layers of papier-mâché. You will need one part water and one part normal white fluid crafting-glue. Then just add some layers of paper and the water-glue-mix for some additional stability since especially the back of the book won't hold a bulimic crack whore after you've removed the binding.


Wait until it's dry (or speed up the process with your good friend, the hair dryer).

Here comes the "I had to improvise!"-part.
I made a little construction out of cardboard and cellotape for the sides of the box-to-be and attached it to the book with more cellotape. I also added the ribbons. With cellotape.


I once heard a saying that went something like this: "If you can't fix it with duck tape, you haven't used enough."

True.

That's why I used some pages from the book and masking tape to stabilise the construction a little more.


If anyone has a better idea for the sides of the box, please let me partake in your wisdom. I couldn't come up with something better in a trice.

After I had used enough whatever-tape, I cut out some fabric to coat the cardboard construction with. I pinned it together and sewed it by hand because it wouldn't fit under my sewing machine.


Then I cut out the fabrics for the inside of the book, sewed them together, trimmed the edges and glued them to the book with some strong glue.


Then I folded the edges of the fabric from the cardboard construction inside the box and glued them to the fabric on the base of the box.


And yeah... that's it. Whoohoo!


Book box.

Put stuff inside to make it happy.
Follow me

September 01, 2010

Ancient Notepaper

Letters are fun. I used to write a lot of them, now the number has decreased a little, but I still like to write and receive them. Also, I'm a sucker for beautiful notepaper. Naturally, when I read saraccino's mail art post, I felt like trying it for myself. Here are the results:


Here's what you need:

paper
mail envelopes
dye (watercolours, coffee, tea, acrylic colours... the possibilites are endless)
stamps
a hairdryer to speed up the process
a flat iron

I tried some experiments with water colours at first, colour gradients and stuff.


Afterwards I applied some golden acrylics with a sponge to get a shiny effect.


And it's okay, but you can tell I have never been very good friends with my paintbox. In addition, I'm more a fan of old-looking stuff. So I tried coffee to give the paper a yellowed and dirty look.


And I do like the results very much. I am sure you can use a variety of different colours in foodstuff and I'm probably going to experiment a bit with fruit tea next time.

At first I brushed the paper from both sides wih coffee (instant coffee works just as fine as real coffee) and blew it dry afterwards (with the hairdryer, obviously). Then I did it a second time to intensify the hue (the lighter papers in the back were drenched only once, the ones in the foreground twice).


After drying them again, I started to sprinkle bigger and smaller drops of coffee on the paper. This time I had them dry naturally for some minutes up to half an hour (depending on the size of the drops) so the characteristic borders around the drops would develop. Then I dried the rest with the hairdryer and ironed the paper and envelops with the flat iron. I felt like it this step further intensified the colours of the coffee, but maybe I was just imagining things. Anyway, it gives you nice smooth paper to write on.


I used these silicon stamps and golden acrylic paint to decorate the paper and envelopes afterwards.


So in the end it's a rather simple design, but I think it's really pretty :'D


Follow me

tagliatelle with a yummy spinach-salmon sauce

Hello dudes, this will be my first contribution to this blog and I hope it will come in handy if you're hungry and have less time.
That is if you like noodles... and spinach and salmon. :D


The recipe will work for two persons (or maybe 3 if they're not as hoggish as Decembersong and I were, when I made it :P)

Ingredients:
250 - 300 g tagliatelle (ribbon noodles)
400 g spinach leaves (fresh or frosted)
400 g salmon filet (fresh or frosted)
half an onion
2 garlic cloves
200 ml Rama Cremefine (or anything else like cream, depends on the fat content you prefer)
salt and pepper
chili powder
nutmeg powder

What to do?
Boil some salted and oiled water, then pour the tagliatelle in. Cook them al dente.
Cut the onion, garlic and salmon into (little) pieces, then roast it all together in a pan. Add some salt and pepper as you like.
While you do that, the spinach should heat up slowly in a pot (low heat!).

When the spinach got warm, put the roasted salmon together with the onion and garlic into the pot, then fill it up with the cream. Heat it up once, then use the spices until it meets your taste.

Alright, now you just have to arrange it on the plates and then: omnomnom!

I hope you'll like it! :)

Greetings,
Qan
Follow me