"All art is quite useless" - Oscar Wilde
RSS

July 30, 2010

Striped Flowers dinner skirt

Oh hi, it's me again with more skirt fun for everyone.

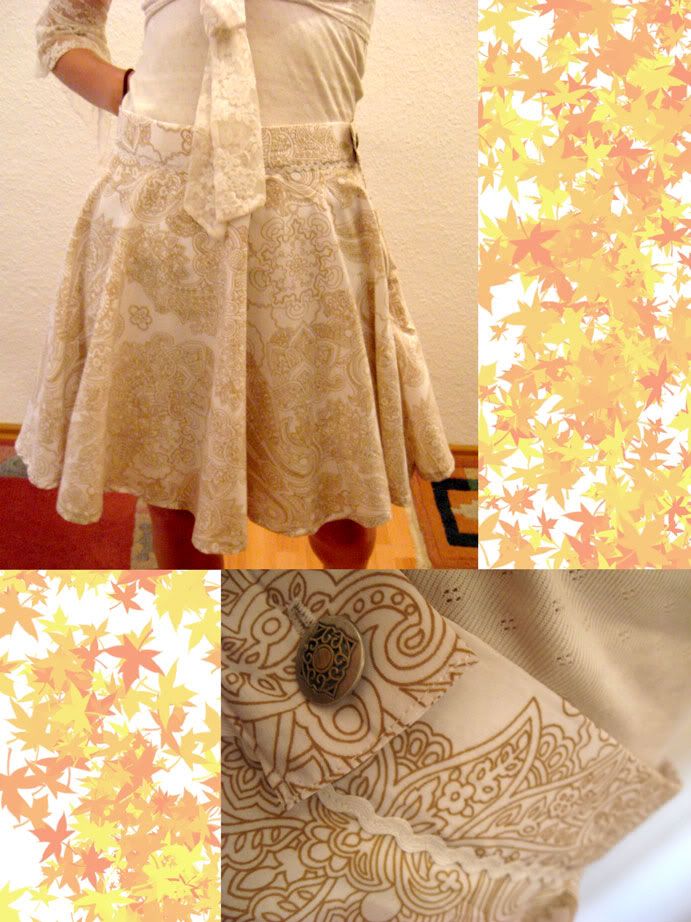
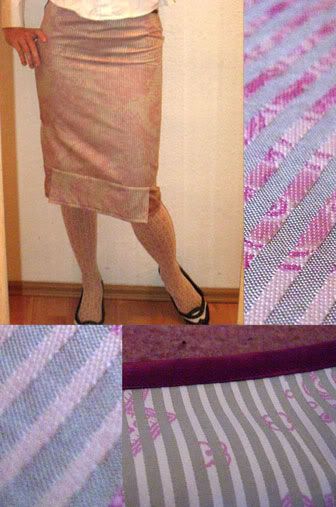
All hail fabric sale, I bought some pretty cheap and nice jaquard fabric and tried to do something more elegant I could possibly wear for a restaurant dinner or whatever.

That's what it turned out like...


Alright, this is another afternoon project and it really doesn't take long.

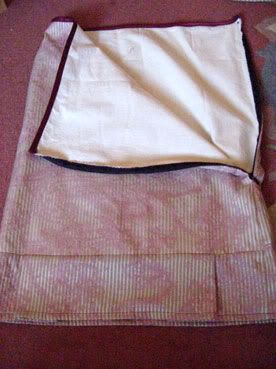
Because jaquard is not very comfortable right on our skin, I preferred to use a layer of white cotton underneath it.

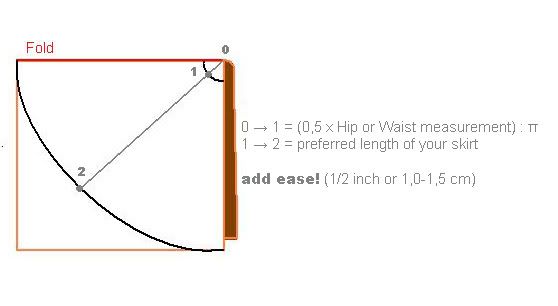
The first picture tells you what measurements you will need.


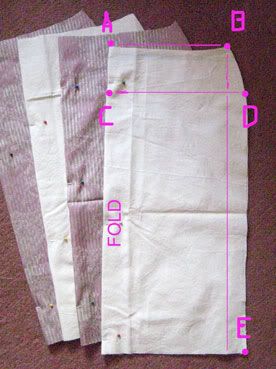
Fold your fabric in the middle before you draw your lines on it.

Line AB: Think about where you would like the top end of your skirt to be (waist? hips? somewhere in between?) and get the measurement of that part of your body. Divide it by four. That's your AB line.
Line CD: Your hip measurement divided by four.
Line AC: The length of how far the top end of your skirt will be from your hips.
 Line BE: How long you would like your skirt to be.

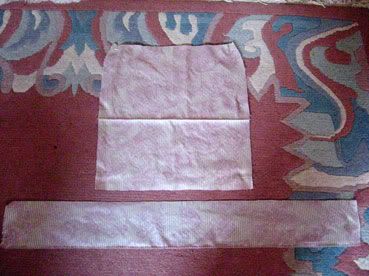
Cut two pieces, one for the front, one for the back. If you add another fabric, cut two pieces of it as well.

ATTENTION: I added a layer of pleats that is not included in these measurements. You can add it or leave it, but think about that before you cut your fabric. If you add pleats, simply subtract the length of your pleats from your overall preferred skirt length.

 Lazy-ass-me didn't iron the fabric before cutting. You might want to do that.


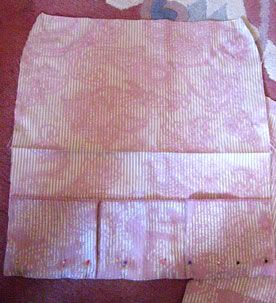
Fold your pleats in whatever way you like and pin down the pleats. As you can see, I only folded it four times and got two pleats this way.


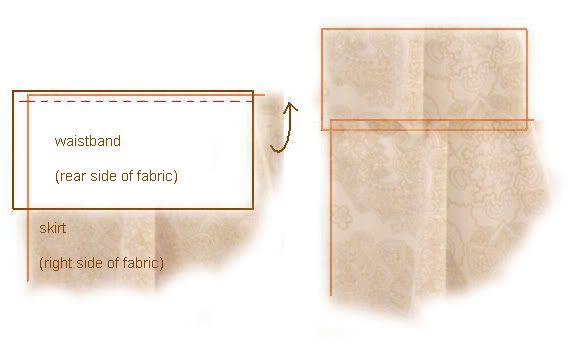
Lay down the pleats on your skirt so that the right side of the pleats faces the right side of the skirt. Make a seam to attach both parts. Trim the ends.


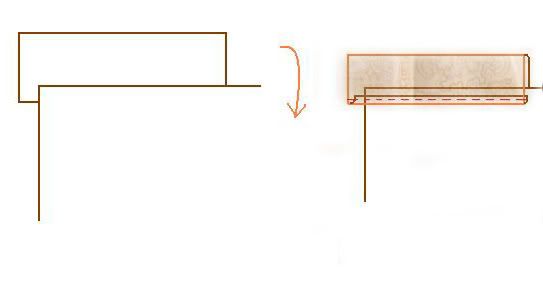
 Now sew in a zipper on one side of the skirt. The best way to do it is like this
.

Sew together the other side of your skirt. You might want to pin it together first, try it on and see if you want to make any corrections.

Afterwards I added satin bias tape (Schrägband) to the top end.


Alright, you're done! You can keep embellishing the skirt and add lace or whatever.


Follow me

July 21, 2010

Halfcircle Skirt

Hi and welcome to my first entry. This post is about sewing a ridiculously easy skirt out of two halfcircles. It's fluffy, nice and you can embellish the skirt in a hundred ways. I chose to keep the one I recently sewed plain and simple except for a button and a zig-zag braid.


Because I didn't take any progress pictures you will have to bear with my sketches. I promise to take pictures of my next project.

How much fabric you will need depends on how long you would like your skirt to be and whether or not you want to add a waistband.
Let's say your waist measurement is 60cm (you can also take your hip measurement depending on where you would like the skirt to be) and you want your skirt to be about 50cm long and you would like to add a waistband. You should do fine with 120cm x 120cm of fabric.


DON'T FORGET TO ADD SEAM ALLOWANCE WHERE NEEDED


1. Cut the fabric. You will need a piece for the waistband (20cm x (waist measurement + 10cm)) and two pieces for your skirt (60cm x 120cm - varies depending on your waist and your preferences for the length of the skirt).

2. You should have two rectangles for your skirt now, and one for your waistband. Fold those for the skirt in half so you get two squares. Now here's a little maths for you. Since we want to have circles, the scope of the small circle is your waist (or hip) measurement. To get the radius you have to divide it by two and the result by pi, or roughly 3,14. That's the length 0 to 1 in the first image. The length 1 to 2 is the preferred length of your skirt. Transfer the lines on your fabric by marking several points on it and connecting them with a line or whatever way you can think of. Now cut.


3. You should have two halfcircles now. Sew them together and put in a zipper on one side.

4. Now you can add the waistband to the top end of your skirt. Add little cuts to the top end every two or three centimeters so you are able to sew the waistband onto a straight line. Place the piece of fabric for the waistband on your skirt so that the right side of the waistband fabric faces the right side of the skirt. Make a seam.


5. Now fold the waistband fabric upwards and enjoy your invisible seam for a second. By now you should have decided on how wide you want your waistband to be. Fold it again to create a top end and the rear side of the waistband faces the rear side of your skirt. Fold the waistband at the bottom end so it protrudes about half a centimeter over the first seam you made.


6.Pin the folded waistband to the skirt and turn the skirt around so you face the side with the first waistband seam. Sew again into that seam so you catch the folded fabric of the waistband on the other side of the skirt.

7. Now you should have two ends on your waistband, preferably at the point where your zipper closes. Fold the fabric at the ends inside and make seams to close the endings. Remember to keep one end a little longer if you want to add a button. The longer end with the button will be hidden behind the short end of the waistband with the buttonhole. As you can see in the pictures, I did it wrong :'D Please do it better.

8. Congratulations, now your skirt is done! :'D Add buttons, braids, lace or whatever suits your taste.
Follow me

July 20, 2010

Painting the Pansies Purple

Hello everybody,

Welcome to my first craft post on this blog. I hope you enjoy the instructions! In case of confusion, I will be happy to help you and answer all kinds of questions.

Whenever I get a new dress, be it bought or selfmade, I am seized by the terrible urge to make matchy stuff to go with it. Since my latest dress has pansies and I have no cream coloured hair accessoiries, I decided to sew a floral fascinator.


There it is in its colourful goodness. The base is an oval of buckram and wire. It is backed with felt (because buckram is ugly) and attaches to the hair with a little metal comb. The flowers are made from different types of cheapo satin ribbon, which I painted to my heart's delight.

In order to recreate the floral arrangement, I recommend reading Helen Gibb's Ribbonwork - The Complete Guide*. In there, she introduces the so called U-gather. It's a technique to gather ribbon (obviously). You take your length of ribbon and sew gathering stitches to create a u-shape, as the name suggests. This is then pulled together to form single petals and leaves. Make multiple U-gathers on one strand of ribbon to form the pink flowers (they turn out best with 6 Us). Generally, it helps to look at pictures of your choice of flowers to find out how the petals have to be arranged. The huge pansy was make from 5 singly u-gathered pieces of ribbon. Everything was sewn on by hand and then painted with thinned acrylics. Paint one colour at a time and always wait until it's dry to avoid wet ribbon soaking in other colours. Hide the edges with lace and add pearls for decoration. Voilá - crazy headdress.

*I would love to give you more detailed instructions and pictures on Mrs Gibbs' method, but I'm afraid she'll sue me for posting them here. Hope you understand. If you need further help, just ask.

Follow me

team

Contributions to this blog are made by the following people:


decembersong


Hello world. This is the blog I created for my friends and me so we can share our creative streak with ourselves and you. I started sewing about five years ago and learned most things by trial and error. I know how much of a help tutorials can be, though, and that is why I wanted to create another one of those countless do-it-yourself pages.
I am a huge fan of country/cottage style stuff. Most of my projects revolve around sewing, but I am trying to do some more knitting and quilting and I also love to cook and bake. Hopefully, you will get some inspiration from the things we will present you here and get started with your own projects. Good luck and enjoy your stay on this blog!


Pi


decembersong asked me to join this blog and well, here I am! Actually I think it is a very good idea to create a large collection of creativity in here~
Personally, I like cosplay and because of this hobby I’ve started to sew 7 years ago. I’ve learnt a lot from friends and my best teacher was creativity itself. In private I like a lot of styles. Right now my boom are sweet Lolita clothes, Gyaru stuff (girlie stuff, I have to admit I so love pink!) and skirts! In addition I do handicrafts, especially when it comes to presents.
My mantra: I can do everything! And you can do it, too (^.~)v


Qantaqa


Yo dudes,
this is Qan. Following decembersong's charming invitation I'm hoping to be able to contribute some cool stuff here. I started cosplaying in 2005 and besides sewing I fancy about making props. So if you wanna know how to make "they don't hurt" weapons and stuff, I hope my entries will be helpful. Furthermore I like cooking and maybe some of my creations will meet your taste.


Glittermuffin


Hi, I'm the Muffin. decembersong asked me to join this blog and I gladly do. I'm pretty much into Lolita and I make most of my clothing and accessoiries myself. Besides sewing and jewellery design, I still work on mastering the arts of millinery, doll- and cosmetic making. I am completely selftaught and my methods are often makeshift. Be prepared. Follow me