
August 05, 2012
Embroidered bookmark
A very nice and quick-to-do present if you give away e.g. a book and you want to make it more personal. I had the idea at my sewing lesson I give every monday to some childeren in a free after-school care club. We stitched birthday cards with yarn on colurful paper. This is also a nice idea also for grown-ups (or pretending to be grown-ups ^^) but I made a bookmark in the evening instead.
 You just need about 10 x 15 cm of a nice paper, I used a page from an old book. Fold it in the middle so that in becomes a long rectangle and unfold it. Now you can design anything you want on the right side of the rectangle. I chose a feather in purple. Draw it with thin lines so you don't see it too much later. Then begin stitching. When you are finished, just glue the sides together like a book. Now you can also change the form of the bookmark (e.g. cutting the upper edges) or insert a hole to adjust a ribbon, maybe in the same colour as your yarn. Now you have a beautiful embroidered bookmark!
Follow me
You just need about 10 x 15 cm of a nice paper, I used a page from an old book. Fold it in the middle so that in becomes a long rectangle and unfold it. Now you can design anything you want on the right side of the rectangle. I chose a feather in purple. Draw it with thin lines so you don't see it too much later. Then begin stitching. When you are finished, just glue the sides together like a book. Now you can also change the form of the bookmark (e.g. cutting the upper edges) or insert a hole to adjust a ribbon, maybe in the same colour as your yarn. Now you have a beautiful embroidered bookmark!
Follow me
Asymmetrical skirt ..or as I call it: The Mullet
The asymmetrical skirt is very easy to sew and the "it piece" of the season. I really like this kind of cut as it puts together the advantages of a long skirt in the back and a short one at the front. ^^ And the German word for it, Vokuhila, is so cool. XD
 Click for pattern scheme :)
 So as you see, you only need a piece of fabric that is a bit wider than your hip, I think mine was about 1,40m wide. The shortest length on the sides can be about 40 cm, the longest you can vary, depending on your leg length, my skirt is about 90 cm long. The fabric I used is a very old one from my grandma, even from GDR-times. When you have cut it, just sew the short sides together, they will be in the front later when wearing it. Then sew a tunnel in the upper part and place a rubber band in it, its length depends on your hip/waist size. Fix it. So that's it. If you wanto to, sew at least the hemline properly. That's it ^^
Follow me
So as you see, you only need a piece of fabric that is a bit wider than your hip, I think mine was about 1,40m wide. The shortest length on the sides can be about 40 cm, the longest you can vary, depending on your leg length, my skirt is about 90 cm long. The fabric I used is a very old one from my grandma, even from GDR-times. When you have cut it, just sew the short sides together, they will be in the front later when wearing it. Then sew a tunnel in the upper part and place a rubber band in it, its length depends on your hip/waist size. Fix it. So that's it. If you wanto to, sew at least the hemline properly. That's it ^^
Follow me


August 04, 2012
Butterfly stationery
Yet another set of writing paper and envelopes
I got beautiful crafting tape for my birthday a while ago and the first thing I did with it was this :D
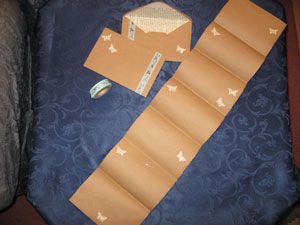
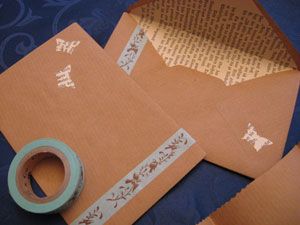
I made the writing paper and the envelopes from normal wrapping paper. The great thing about wrapping paper is that it comes in rolls, so my writing paper pages are really long. Which is great because I tend to write long letters and it always bugged me that stationeries only contain one (!) page of paper for each enevlope. Who could make do with that?!

I coated the insides on the enevlopes with the pages that were leftover from my book box project and also used them for the butterflies on the enevelopes and writing paper.
Finally some nice paper tape and done!
Really fast and easy project :D
Follow me
I got beautiful crafting tape for my birthday a while ago and the first thing I did with it was this :D
I made the writing paper and the envelopes from normal wrapping paper. The great thing about wrapping paper is that it comes in rolls, so my writing paper pages are really long. Which is great because I tend to write long letters and it always bugged me that stationeries only contain one (!) page of paper for each enevlope. Who could make do with that?!
I coated the insides on the enevlopes with the pages that were leftover from my book box project and also used them for the butterflies on the enevelopes and writing paper.
Finally some nice paper tape and done!
Really fast and easy project :D
Follow me
Parasol
I made a parasol from a normal umbrella as a commissioned work for my only customer ever :'DDD (I make a lot of stuff for other people, but they are usually presents from me to them).
It's a really easy project, especially since you can do it the pro way or the noob way. I did it the noob way because I'm lazy and the result is just fine!

There are quite some nice step by step tutorials for this project you can find on the internet.
First you have to take the top off the umbrella and cut the threads that hold the fabric to the skeleton. Take off the fabric.
The pro way is to undo some threats of the cover so that you have one of the eight parts that make up the fabric cover of the umbrella. You can use this as a pattern to create eight other parts with your own fabric and sew them together to create a new cover.
I did it the noob way and just put the open skeleton on the fabric I wanted to use and cut around. I'm pretty good at cutting, so no problem there. Plus I saved myself a lot of time and bothersome seams.
I did that twice because I used some nice lace fabric on top of a semi-translucent fabric.
Pinned both fabrics together afterwards and sowed them together. Added two kinds of lace for embellishment. Tadaaa!
Oh wait - the last part is extremely boring and annoying. You have to re-attach the cover to the skeleton by sewing it to the eight arms. I did that three times for every arm, so 24 times. But then I was done, thank god!
You have to be careful, though! The two layers of fabric are much heavier than the original fabric, so be gentle when opening and closing the parasol, don't give it hard waves and better not use it in heavy wind.
The parasol can be tied together with a satin ribbon.

 Follow me
It's a really easy project, especially since you can do it the pro way or the noob way. I did it the noob way because I'm lazy and the result is just fine!
There are quite some nice step by step tutorials for this project you can find on the internet.
First you have to take the top off the umbrella and cut the threads that hold the fabric to the skeleton. Take off the fabric.
The pro way is to undo some threats of the cover so that you have one of the eight parts that make up the fabric cover of the umbrella. You can use this as a pattern to create eight other parts with your own fabric and sew them together to create a new cover.
I did it the noob way and just put the open skeleton on the fabric I wanted to use and cut around. I'm pretty good at cutting, so no problem there. Plus I saved myself a lot of time and bothersome seams.
I did that twice because I used some nice lace fabric on top of a semi-translucent fabric.
Pinned both fabrics together afterwards and sowed them together. Added two kinds of lace for embellishment. Tadaaa!
Oh wait - the last part is extremely boring and annoying. You have to re-attach the cover to the skeleton by sewing it to the eight arms. I did that three times for every arm, so 24 times. But then I was done, thank god!
You have to be careful, though! The two layers of fabric are much heavier than the original fabric, so be gentle when opening and closing the parasol, don't give it hard waves and better not use it in heavy wind.
The parasol can be tied together with a satin ribbon.
Axolotl fishbowl
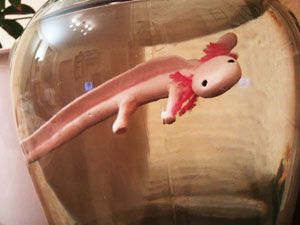
This is my axolotl fishbowl!
Actually, it is not mine anymore. It started out as a symbolic present for a character in a live role playing game and kept getting more elaborate in the process. In the end the effort was totally over the top, but I just had so much fun working on it :D
I had this reeeeally big jar from a job at a delikatessen shop and wanted to do something with it so bad.

So I made an axolotl out of fimo and baked it in the oven. The eyes are little pearls. Then I added several layers of water proof lacquer and attached some fuzzy wool on the head as gill rakers.


Then I added some decorative stones to the bottom of the jar and filled it with tap water.
Finally I just tied some transparent thread to the axolotl and attached it to the inside of the lid with adhesive tape.

Easy as pie!
You could add fake aquatic plants or other aquarium decoration to make the whole thing look even nicer. But it's really fast and chep project and it looks great :D And so cute! Follow me
Actually, it is not mine anymore. It started out as a symbolic present for a character in a live role playing game and kept getting more elaborate in the process. In the end the effort was totally over the top, but I just had so much fun working on it :D
I had this reeeeally big jar from a job at a delikatessen shop and wanted to do something with it so bad.
So I made an axolotl out of fimo and baked it in the oven. The eyes are little pearls. Then I added several layers of water proof lacquer and attached some fuzzy wool on the head as gill rakers.
Then I added some decorative stones to the bottom of the jar and filled it with tap water.
Finally I just tied some transparent thread to the axolotl and attached it to the inside of the lid with adhesive tape.
Easy as pie!
You could add fake aquatic plants or other aquarium decoration to make the whole thing look even nicer. But it's really fast and chep project and it looks great :D And so cute! Follow me