Because I didn't take any progress pictures you will have to bear with my sketches. I promise to take pictures of my next project.
How much fabric you will need depends on how long you would like your skirt to be and whether or not you want to add a waistband.
Let's say your waist measurement is 60cm (you can also take your hip measurement depending on where you would like the skirt to be) and you want your skirt to be about 50cm long and you would like to add a waistband. You should do fine with 120cm x 120cm of fabric.
DON'T FORGET TO ADD SEAM ALLOWANCE WHERE NEEDED
1. Cut the fabric. You will need a piece for the waistband (20cm x (waist measurement + 10cm)) and two pieces for your skirt (60cm x 120cm - varies depending on your waist and your preferences for the length of the skirt).
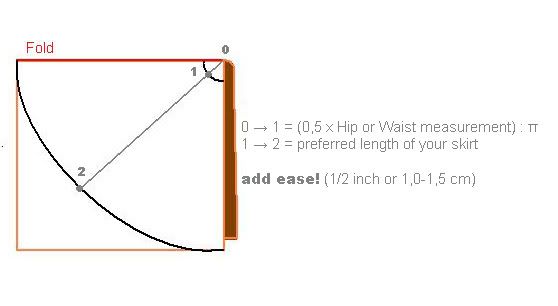
2. You should have two rectangles for your skirt now, and one for your waistband. Fold those for the skirt in half so you get two squares. Now here's a little maths for you. Since we want to have circles, the scope of the small circle is your waist (or hip) measurement. To get the radius you have to divide it by two and the result by pi, or roughly 3,14. That's the length 0 to 1 in the first image. The length 1 to 2 is the preferred length of your skirt. Transfer the lines on your fabric by marking several points on it and connecting them with a line or whatever way you can think of. Now cut.
3. You should have two halfcircles now. Sew them together and put in a zipper on one side.
4. Now you can add the waistband to the top end of your skirt. Add little cuts to the top end every two or three centimeters so you are able to sew the waistband onto a straight line. Place the piece of fabric for the waistband on your skirt so that the right side of the waistband fabric faces the right side of the skirt. Make a seam.
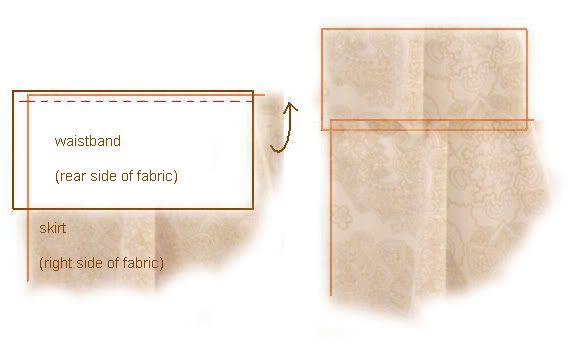
5. Now fold the waistband fabric upwards and enjoy your invisible seam for a second. By now you should have decided on how wide you want your waistband to be. Fold it again to create a top end and the rear side of the waistband faces the rear side of your skirt. Fold the waistband at the bottom end so it protrudes about half a centimeter over the first seam you made.
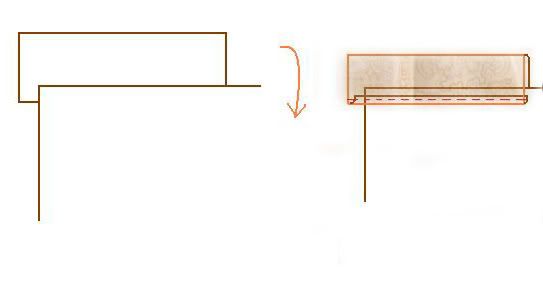
6.Pin the folded waistband to the skirt and turn the skirt around so you face the side with the first waistband seam. Sew again into that seam so you catch the folded fabric of the waistband on the other side of the skirt.
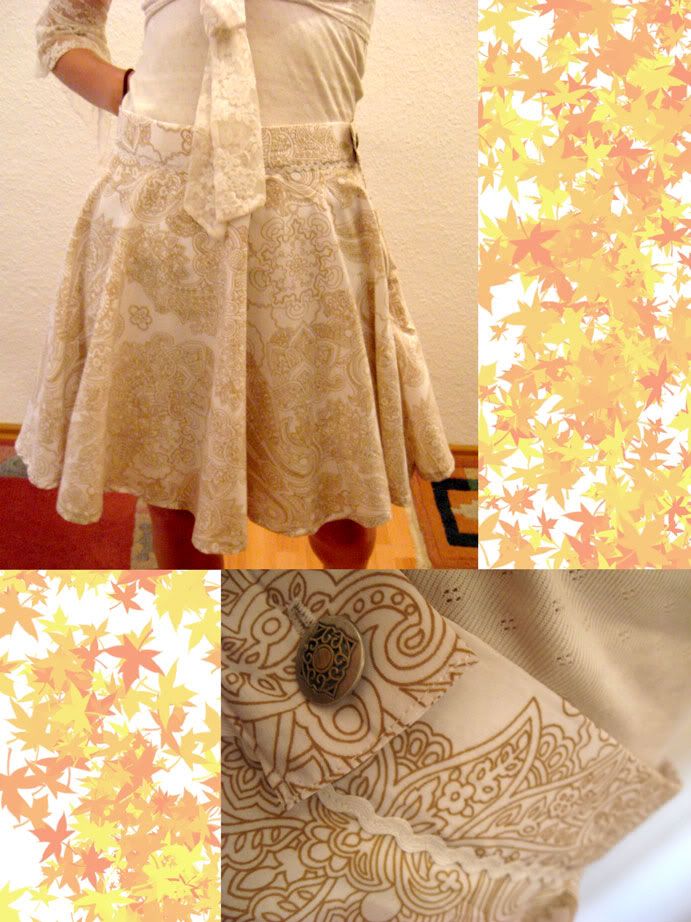
7. Now you should have two ends on your waistband, preferably at the point where your zipper closes. Fold the fabric at the ends inside and make seams to close the endings. Remember to keep one end a little longer if you want to add a button. The longer end with the button will be hidden behind the short end of the waistband with the buttonhole. As you can see in the pictures, I did it wrong :'D Please do it better.
8. Congratulations, now your skirt is done! :'D Add buttons, braids, lace or whatever suits your taste.
0 comments:
Post a Comment