"All art is quite useless" - Oscar Wilde
RSS

May 15, 2011

Steampunk Clock

Sometimes I create things that simply turn out to look crappy when I'm done. I usually throw them away. This time I created something that didn't work. I decided to post it anyway because it still looks pretty, which makes it even worse because it's useless :/


This was supposed to be a birthday gift for a friend, and it worked fine until I decided to disassemble it...

The watch was a giveaway, but it has a Quartz clockwork, so I thought it would be rather long-living.


 I bought some nice steampunk-themed paperr, took off the clockhand and started to decorate the watch. Really very easy, nothing elaborate. Afterwards I drew the 3, 6, 9 and 12 onto it.
 Then I bought a new set of clockhands and added them.
I put the battery back in and that's where it stopped working.


I don't know what went wrong, it worked perfectly before that. Maybe some of the glue got into the clockwork but I don't think that's possible. Anyway, it's broken and makes for nothing more than decoration now.


Well, I guess things like that just happen.


I eventually decided to hang it on my wall anyway since it's too pretty to gather dust in some corner :D Also, it goes well with my Mucha posters. Follow me

Skirt Alert

I wanted to post some pictures of my skirts for ages now, but somehow I forgot to... Anyway, here are my two latest pieces, very very simple, and no tutorial. However, it's very easy to figure them out for yourself.


The first one I made last autumn or winter. It's a very soft and thick cotton skirt and I have to admit it's my favourite since the first time I wore it. And the pattern is lovely, though I wasn't sure about that back when I bought it.


Sorry for the bad image quality ^^;

As you can see in the picture below it's simply a square to which I attached two trapezes (no rectangles because of the slanted hip line).
Finally I just added a zipper. Done!


The second one is a double-layered skirt made of creme-coloured cotton with a lovely flower or rose print on it. The underlying layer is made of creme-coloured IKEA cotton fabric. It's nice because it's robust and cheap, but I won't use it again for a visible layer because it crinkles heavily and I hate to iron my clothes. Such a waste of time...


It's really just 4 trapezes again (two for each layer) with a zipper at one side and one layer being, obviously, longer than the other one.


Love the pattern!

That's it :'D More to come? We'll see. The next weeks I'll be busy working on the axolotl tutorial and on sewing my very first quilt. The fabric I've bought so far already makes me despair. Lot of fun ahead!
Follow me

Kitchen Wall Decoration

Sometimes I get the inner urge to decorate something new....


Last week I walked through the household section of the local "Müller" store and fell in love with some decoration elements in light brown with antique forks and knifes. I like this motive since I got napkins for my birthday with this motive.
I bought a little cupboard for kitchen utensils (only 6€, reduced ^^) an the canvas (3€, also reduced) and for the background I took silk paper from "Galeria-Kaufhof" since I have no possibility to get real wallpaper here in Halle without a car.
I really like the result. ^^

[PS: The rest of my kitchen looks very ugly, so at least this side had to become pretty]


You like?
Follow me

April 04, 2011

Book purse

As some of you may know, I make my income supporting my studies by making purses out of books.
Well, as I don't want to adorn myself with borrowed plumes, I have to admit that this beautiful accesoire is very common in the United States.
If you want to sew such a purse too, just look behind the curtain.


I think it's pretty easy to sew such a purse.
At first, you look for a very beautiful old book and some fabric (about 40 x 110 cm) thats fits to the cover of the book. Cut out the pages with a safety knife and keep it for further information ;-) Also you need about 1,50 of cord and other things you see in the picture:


Now we need a pattern. Use baking paper. I normally take the normal size of the book when its opened, add 1 cm seam allowance and then we put wings in the middle of the book, wide as the spine of the book an the sides have to be as long as the half of the long side of the book minus the half of the spine. Then draw a line at each side with around 65 degrees, you may need a set square to be exact. Also add a litte seam allowance here around the wings.


Then cut out the pattern, put it on the doubled fabric an eventually use "flieseline" on top to make it a bit stiffer.

Cut out the pattern with the fabric and don't forget to have four squares to attach the handles.

Iron the fabric with the Flieseline, sew the sides of the squares together and turn it around to the right side, also iron it.
Now we need the glue. Put a small amount of glue in the corners of the book and blur it with a Q-tip, put the strips on and give some glue onto them, to attach the cord on them as handles, close the strips an glue them on the book. (pew, that was hard to describe)
Then make it fix with clamps.

Now we sew the inlay. Put the fabric together so that the wrong sides look at each other and sew around the borders, leave a little hole.

Now make a little crop with a scissor in every corner which goes inside, that there are no wrinkles later on.

Now we turn the inlay to the right side by pulling one wing through the hole on the other side and also the rest. Now we iron again to have the inlay flat.

Attach the wings on the sides by sewing with a criss-cross-stitch and you get an inlay that looks like a hat XD.


It's nearly done. Just glue the inlay into the book.

Also fix with clamps and let it dry.

To close the purse, you can use satin bands and make a ribbon, or buttons on the one side and an elastic on the other. I normally make a "tongue" where i put a magnet inside and another magnet on the front of the book inside.

There are a lot of variations to make it pretty.

Thats the result:


More on my homepage.
Follow me

Doily bowls

Heyho, this is my first contribution to the blog.
As easter is coming, I wanted to craft something for my family and I found an instruction for beautiful little bowls.


At first, I bought some air-drying clay and a cute doily, the latter was hard to get. I looked for it in every 1€-shop in Halle and found nothing, till I had the idea to go to an antique shop where they had the famous "Plauener Spitze" even for a good price.
So at first, you get something to put under the clay, then you roll it out with a rolling pin till it's very flat, but not too flat to break later. Then you get a small dish to get the round shape and you cut it out with a stump knife and remove the rest.
After this, put on the doily, but do not cover the clay fully, I let the doily cover around two thirds of the circle and then you use the rolling pin again to get the pattern into the clay.
So, it's nearly done. Just put the clay circle into another bowl and let it dry (mine was about 24 hours).
If you like, you can use a rasp to make the edges a bit smoother, but be careful!
Finally, I had some spray-on white I used to make the "not so white"-white of the clay a bit brighter.
My clay was enough for 5 bowls.
I will decorate these bowls with some light-green grass for easter and some chocolate eggs to have a pretty nest.

Here the original DIY from Dawanda.

Have fun doing :3
Follow me

December 28, 2010

Axolotl Plushie

"I am cute!!!"


Now this was a Christmas present I made. I was very eager to keep it for myself when it was done, but I gave it away in the end XD

Things you need:
- paper for a pattern
- fabric for the body and the dorsal fin (or whatever that is)
- yarn (don't use cotton! I did...)
- fuzzy wool for the gill rakers
- eyes
- stuffing

Basically I just made a pattern out of copy paper and newspapers based on some axolotl pictures I found.
I bought some really nice and fuzzy fake velours leather and used it for most of the plushie.


I bought cotton yarn, but that was not a good idea since it's not very tear-proof. I noticed that during the stuffing process. So maybe you better stick with synthetic yarn.

After cutting out all the pieces I made the gills from small fabric straps and added the gill rakers by attaching some fuzzy wool at the sides.

The rest is basically just thinking about in which order to sew the parts together.


Axolotl picture taken from here.

Be sure to leave a hole through which you can stuff in the stuffing. I'm still not too good at that. Somehow it never becomes a really smooth stuffing, some parts are always crumbling together. Oh well...


Anyway, this is it!

You know you can never grow too old for plushies.
Follow me

December 23, 2010

It's just a piece of cake!

Hello fellows, here comes a very sweeeeet possibility to create a present for your loved ones (if they like sweet things, of course).

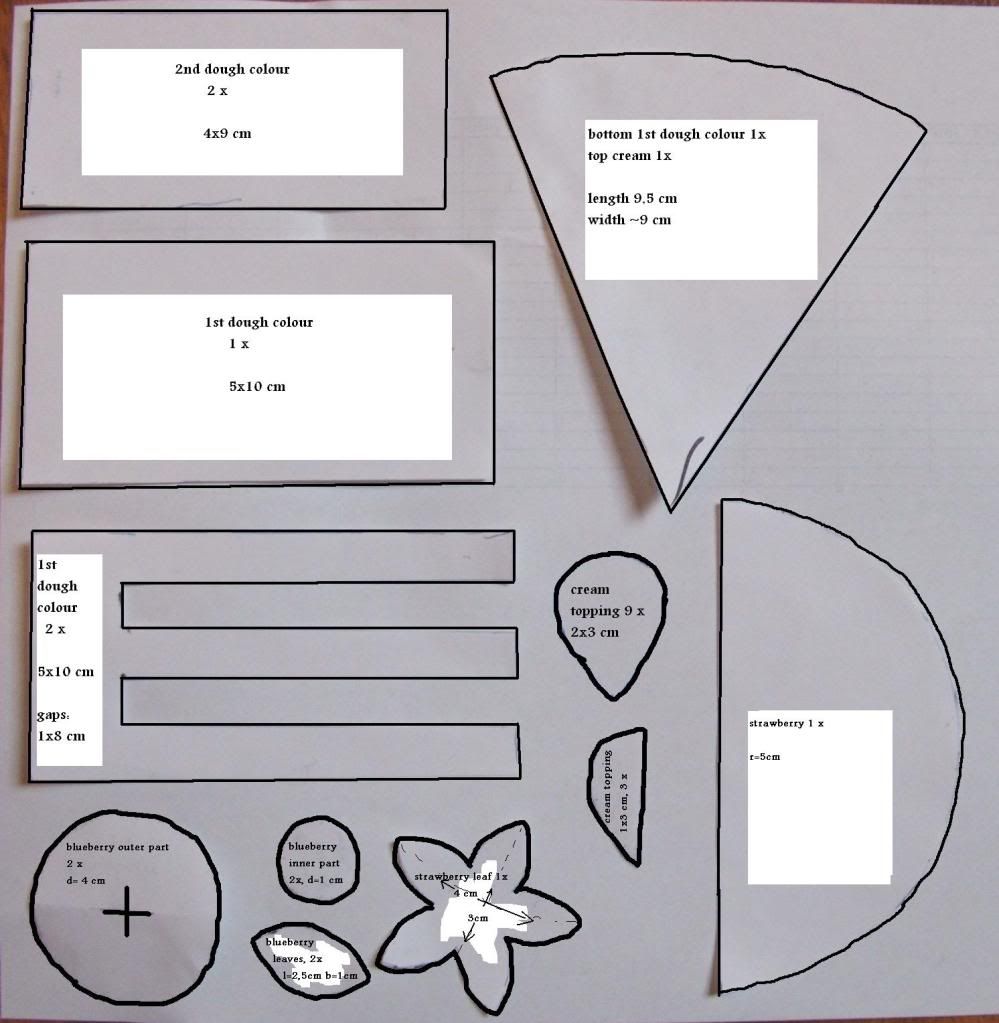
I took a photo of the pattern I used and tried to mark it for better understanding. Sitting at my parents home I can't use another program to draw on the computer, which would not be any better, anyways. >D
(click to enlarge)
I acutally used a pattern, decembersong got from some friends a little while ago. It was a Japanese handicraft box including the pattern plus felt.

So this is what you need:
the pattern
different colours of felt
some wad/cotton wool for making plushies, e. g.
scissors
needle/s and threads in matching colours
maybe some glue

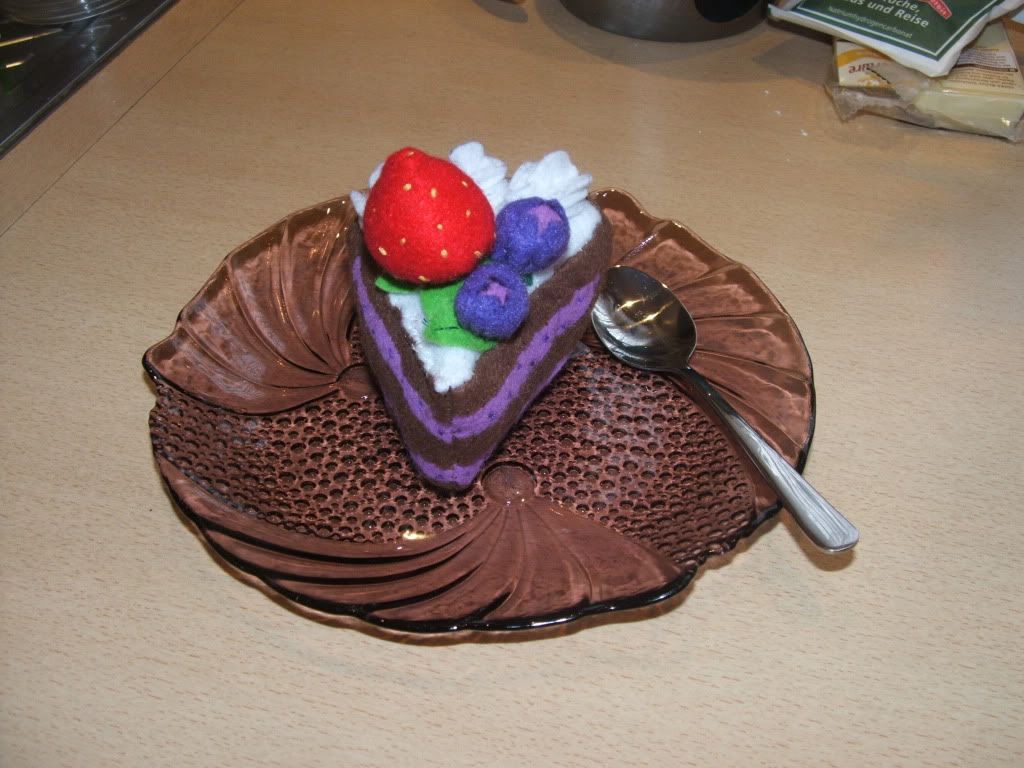
I used
middle brown as 1st dough colour
light violet as 2nd dough colour
white for the cream topping
dark violet and light violet for the blueberry
red for the strawberry
light and dark green for the leaves

First, cut out all the patterns. Then start sewing the side parts of the cake. Sew the part of the 1st dough colour with the gaps and the littler 2nd dough part together using a thread coloured like the 1st dough. Sew the side parts on the side where the gaps are, together. You may add some little dots in a different (darker) thread-colour onto the the 2nd dough colour to make it look like there were pieces of fruit in it.
When finished attach the side parts to the bottom part, then add the back part (it's the biggest square on the pattern labelled 1st dough colour, 1x).
Start sewing the top part onto the cake, but leave a little part of it open to fill in the wad, until it's a puffy piece of cake, then close the gap.

Now you can start making the decoration:
Use some yellow thread to apply little dots on the red strawberry felt, then loosely sew a thread through the round part of it. Leave some thread at the end and don't make a knot. Then bend the felt, so it looks like a little cone and sew the straight parts together. After that stuff some wad into the cone and pull on the thread you left at the round part of the strawberry, it will kind of riffle right now and close around the wad. Pull tightly and then sew through the bottom part of the strawberry to ensure that it won't open again.Now attach the strawberry leaf with green thread.

For making the blueberries, cut the cross in the middle of the bigger circle, then sew or glue the little circle onto it. Now sew a loose thread round the edges of the bigger circles each and leave some at the end, not making a knot again. Fill in some wad and pull the thread like you did with the strawberry.
For the little leaves use some lighter or darker thread to sew a line on them, so it looks like a leaf vein, then attach them to the blueberries.

Now you have to sew the cream topping. Sew 3 of the drop-shaped white felt parts together by sewing a line from one end to the other. Then add one of the 3 "half-drops" at the top. I guess you will have to twitch a little until it looks nice.

When finished, add the decoration to the top of the piece of cake.
First, sew the cream topping onto the back edge of the white cream top part. Then place the strawberry and the blueberries in the middle.

Tadaaa~ finished.
You can either give this away as a present or decorate your home with it. :)

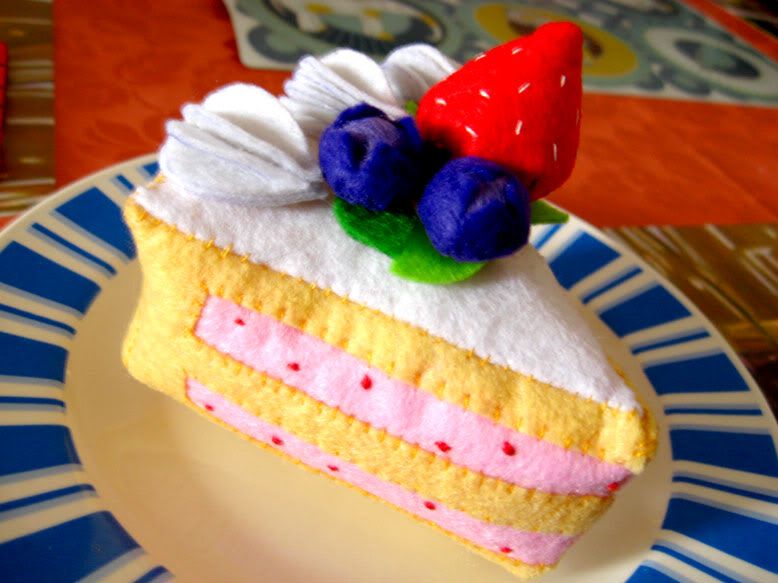
Here you can see the cake, decembersong sewed:


Follow me