"All art is quite useless" - Oscar Wilde
RSS
Showing posts with label clay. Show all posts

August 04, 2012

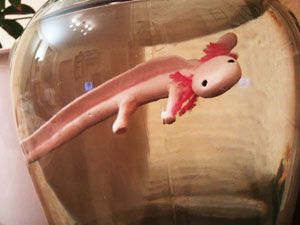
Axolotl fishbowl

This is my axolotl fishbowl!


Actually, it is not mine anymore. It started out as a symbolic present for a character in a live role playing game and kept getting more elaborate in the process. In the end the effort was totally over the top, but I just had so much fun working on it :D


I had this reeeeally big jar from a job at a delikatessen shop and wanted to do something with it so bad.


So I made an axolotl out of fimo and baked it in the oven. The eyes are little pearls. Then I added several layers of water proof lacquer and attached some fuzzy wool on the head as gill rakers.


Then I added some decorative stones to the bottom of the jar and filled it with tap water.


Finally I just tied some transparent thread to the axolotl and attached it to the inside of the lid with adhesive tape.


Easy as pie!

You could add fake aquatic plants or other aquarium decoration to make the whole thing look even nicer. But it's really fast and chep project and it looks great :D And so cute!
Follow me

April 04, 2011

Doily bowls

Heyho, this is my first contribution to the blog.
As easter is coming, I wanted to craft something for my family and I found an instruction for beautiful little bowls.


At first, I bought some air-drying clay and a cute doily, the latter was hard to get. I looked for it in every 1€-shop in Halle and found nothing, till I had the idea to go to an antique shop where they had the famous "Plauener Spitze" even for a good price.
So at first, you get something to put under the clay, then you roll it out with a rolling pin till it's very flat, but not too flat to break later. Then you get a small dish to get the round shape and you cut it out with a stump knife and remove the rest.
After this, put on the doily, but do not cover the clay fully, I let the doily cover around two thirds of the circle and then you use the rolling pin again to get the pattern into the clay.
So, it's nearly done. Just put the clay circle into another bowl and let it dry (mine was about 24 hours).
If you like, you can use a rasp to make the edges a bit smoother, but be careful!
Finally, I had some spray-on white I used to make the "not so white"-white of the clay a bit brighter.
My clay was enough for 5 bowls.
I will decorate these bowls with some light-green grass for easter and some chocolate eggs to have a pretty nest.

Here the original DIY from Dawanda.

Have fun doing :3
Follow me